Having someone finish your ornaments can get EXPENSIVE. If you’re like me and would prefer to spend your money on stash, it’s best if you learn how to do your own finishing. I’ve seen other tutorials on-line and there are lots of different techniques out there. The technique I use is very easy and fast and can be adapted for other types of finishing. Also, I don’t like to use glue. Glue will dry out over time and your needlework ornament will start to fall apart or the chemicals in the glue will degrade the fabric. I know lots of people use glue but personally, I’d like my ornaments to become heirlooms that will hang on my own, my friends and my family’s trees for years to come.
I also like to use materials that are simple to work with and cheap to buy! For years I struggled with how to cut mat board without a bid mat cutter and I hated the idea of corrugated cardboard!
Also, if you’re like me, you learn visually so seeing pictures is way better than reading instructions.
So here we go… I promise you that this is easy and beginner friendly. Just try it!
First get together all the supplies you will need for finishing:
- Your completed needlework, freshly pressed
- Backing material (I chose a beautiful silk dupioni)
- Cotton quilters batting, the key is using natural materials
- Cardboard cut into the shape of your ornament (see note below!) – you will need 2 pieces
- Craft Bond Glue Stick (yes, it’s glue but it’s acid free and we don’t use much)
- Pre-made cording or you can pick your own fibers and use a cording drill (I chose a Silk Perle #8)
- Sewing thread
- Your choice of embellishments (I chose satin ribbon and jingle bells)

NOTE about Cardboard: Although I do now have a mat cutter, I still like to use easy materials that are cheap to buy. For light weight projects like ornaments, I like to use comic book boards. Comic Book Collectors use these acid free boards to store their comic books to keep them from getting mashed. As it turns out, they are GREAT for making into ornaments. You can get a cas eof about 100 boards for about $10. They are about 2 mm thick so they are really wonderful for needlework finishing and you can cut them with regular utility shears. Here’s a great source for buying them (no affiliation!): http://www.bcwsupplies.com/cat-Comic+Boards.htm
Step 1: Cover cardboard with batting
This is where you will use the Craft Bond glue stick. It dries FAST (and clear even though it goes on blue) and it’s Acid Free. Wendy White introduced me to Craft Bond at a class that I took with her. It’s great stuff! I don’t like to use hot glue for this because it makes lumps.

Take one of your cardboard cutouts and smear the Craft Bond on. Quickly apply your cotton batting cut slightly larger than your cardboard.
The adhesion doesn’t have to be strong. Use shears to trim the excess batting around your cardboard. Repeat this for both pieces of cardboard.

Step 2: Apply Backing Fabric
Thread your sewing needle using the loop method (so that you have two plies and knot at the end. Baste stitches in the backing fabric about a half inch larger round than the ornament. Trim fabric about a half inch around the outside of the basting stitches.
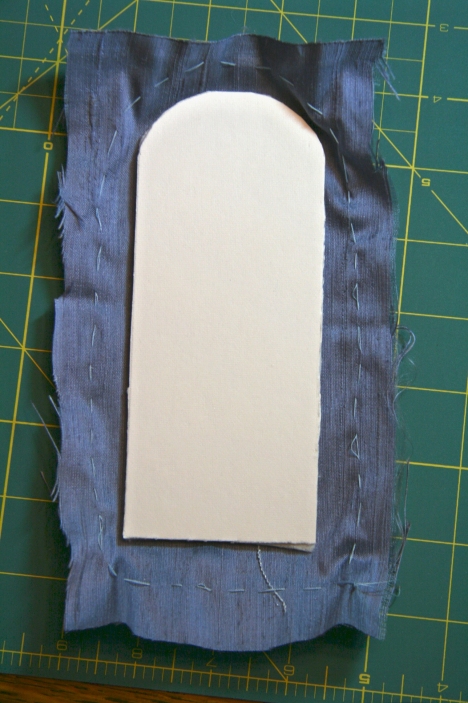
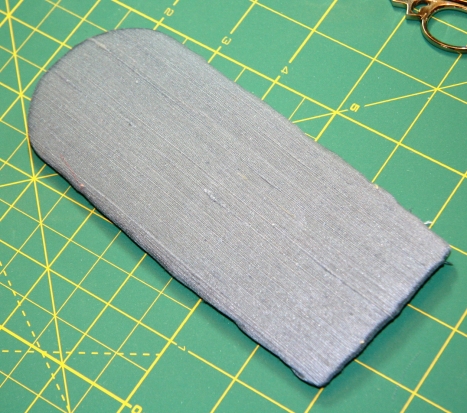
Pull the basting threads taught in order to gather the fabric fairly tightly around the cardboard. I like to thread the needle through the knot at the other end and pull the thread as a loop. Add additional lacing stitches as needed. Use your iron to press the gathered fabric flat. (Be careful of temperature setting)

This is what it looks like on the neat side!
Step 3: Lace Needlework to front piece of cardboard
If you are like me the words “Lace” send shivers of terror down your spine. I understand… but this is small and easy. Trust me.
Center your stitching over your cardboard and add your basting stitches as you did with the backing fabric. Don’t worry if the stitching is PERFECTLY centered. Thre great thing about lacing is that you can manipulate the stitching as you go.
Trim about 3/4ths of an inch around the outer basting line. I like to give myself a little more room because of the lacing but if you only have a half inch, it will still work.
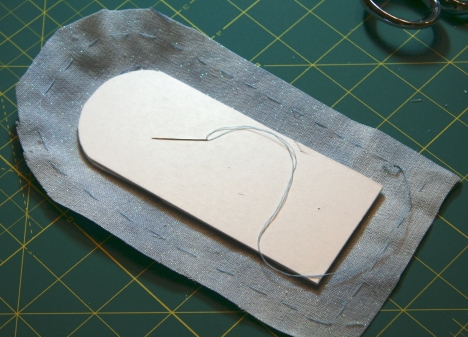
Again, gather your stitches. Then add some back and forth supporting stitches (… laces…). Pull these tight like you would your own shoe laces. As you pull the laces tight, turn over your work and manually manipulate the centering of your needlework until you are satisfied. Tie off the laces and steam press the gathered fabric flat.

This is what the pretty side looks like!

Step 4: Make Cording (or you get buy pre-made!)
To make cording, take your selected fibers and cut into very long even pieces. I cut mine at about 48″ long. I used #8 Perle Silk but you can use anything you’d like. I had this in my stash so that’s what I used!
Take each strand and lay them evenly together. I used 7 strands but you can use more or less depending on the thickness of your thread and the look you are going for. Knot each end.
Attach one knotted end either to a stationary object (like taped to the edge of a table) or attach it to your helpful friend or family member.
Insert the hook of your hand cording drill (or you can use a pencil but that is quite time consuming! A coding drill is not expensive and is worth its weight in gold) into one end of the strands as shown.

Pull the strand fairly tight and twist the crank on the drill. Keeping cranking the drill until the cording wants to curl up on itself when you loosen up on the tension.
Hold the drill end of the cord and remove the drill hook. Place the drill hook over the cord and let it dangle while you bring the two ends together. Like magic, the cord will perfectly twist onto itself in a way that creates beautiful cording!
Place a little piece of tape on the messy end to secure the two ends together. Presto! You have cording!

Step 5: Stitch Ornament and Cording Together with Ladder Stitch
Believe it or not, you’re almost done.
I like to stitch both halves of the ornament together at the same time as I attach the cording. I use a ladder stitch so the stitches disappear. Plus, this pulls the fabric tight to the cording. Not to mention I’m lazy and I don’t want to stitch around this puppy twice!
Line up both halves of the ornament and hide the messy end of the cording in the ornament sandwich. I like to do this at the top center because I’ll hide this point later on. Take a needle threaded with strong sewing thread up through the cording and into one side of your ornament.

Stitch all the way around with a ladder stitch. When you do your short perpendicular stitch, put the needle through the cording as you stitch from one side to the other (look at the pictures for more information).
I have lots of pictures here in case you aren’t familiar with the ladder stitch. Basically the ladder stitch is as follows:
1. You do a semi-short (maybe 4 or 6 linen threads long) stitch under the linen, parallel to the edge of the ornament (stitch this at the edge of the ornament.

2. This is your perdendicular stitch. The stitch is done at a 90 degree angle from the end of the ornament. Take your needle and push it through the cording (best of you can do this into one of the cording twists) from front to back.

3. This will be a parallel stitch, just as you did on the front side. Insert your needle into the backing fabric for a semi-short stitch and come back up parallel with the edge of the ornament. You want to do this stitch close to the edge.

4. Come back through the cording for the next perpendicular stitch.
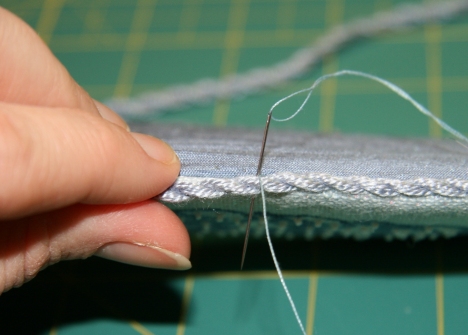
That’s the Ladder Stitch! Every so often pull your thread pretty hard (this is why you need STRONG thread). You will see your stitches magically disappear the the two sides of the ornament with nest closely together with the cording. It’s a beautiful look!
Stitch all the way around and when you come back to the top, make a loop with the cording and secure.

Your basic ornament is now finished!!!

Step 6: Embellish as you would like!
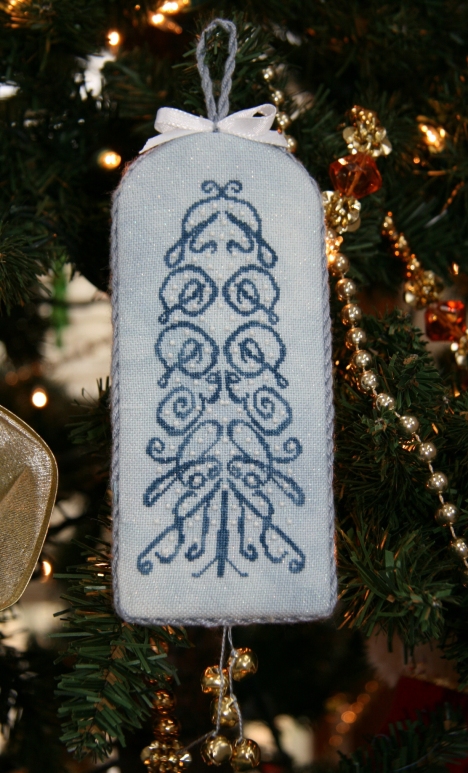
This is where you can be really creative. I used ribbon to make and sew a small bow to the top of the ornament and I added two strings of jingle bells.
When you are all done, make sure you take a picture and post it in your Webshots or Flickr album or wherever you keep your needlework pictures! Best of all, enjoy your newly finished ornament. Rest assured that you have constructed it so that it will last for many years.


Thanks for such easy instructions. I am going to print them out right away so as to have them next season when I am doing ornaments again. I have already called my son-in-law and asked him for a few comic book boards as he collects comics and has lots of them.
Beth – ;)
Does your son still collect comic books? I have about 25 of them from the 30’s and 40’s. email me. parussell@earthlink.net
Beautiful stitching! Beautiful finishing!
Wow, I’ve been doing mine for years for the hot glue gun, but I think your method will be easier and neater. Thanks! :)
Stacy, this tutorial is terrific! Thanks so much for taking the time to share your technique. I know it will become a favorite of mine.
Hi Stacy, just a question about “gathering the stitches” after you baste around the fabric. Does this mean you just pull the thread tightly to make it gather and then do the lacing?
Thanks very much for the tutorial; if I get brave, I might give it a try!
Yup! That’s exactly what it means!
Stacy
Absolutely outstanding directions.Thanks so very much.
I have looked and looked for a website on finishing techniques. I quit looking and low and behold, I found your site and all your wonderful techniques. I would like to see if you know how to finish using the “box” type finish. I think it is where they use stryofoam and cover the back with batting and fabric on the backside and put your finished project on the front. Have you seen this?
Is this the same method used with needlepoint ornaments done on canvas?
These instructions are so clear and your needlework is SUPER! I notice you quilt as well. Have you ever been to the Quilt Show in Paducah?
thank you i have quite a few ornaments to do and was trying to come up with a way to finish them off, this is beautiful, t hank you again for sharing.
Oh my gosh, I have looked for this info. so many times and come up empty handed. Your info.and detailed instructions are great. I don’t know if I would do the star and shapes like that, but I can sure save the $$ on the round ones.
Thank you so much for your feedback! I admit I haven’t blogged in AGES… this is a great reminder that I need to get back to it… I’ve done so much stitching since I posted my last entry!
These instructions are fabulous. I wish I had looked before I started, now I’m in the middle and have to muddle thru. Thank you so much for sharing.
Thank you for taking the time to post this. I had no idea how I could
get a finish that was as good as the work itself so over the years I have parted with a lot of money that should have stayed in my pocket.
Will always do my own finishing now.
I’m so thankful for this info! I have a couple of ornaments that have been waiting several years for finishing, because like you, I’d rather spend my money on more supplies. And I didn’t want to ruin my work by doing a poor job while I figured it out by myself. Thank You!
I have been using mat board for my ornaments and have a terrible time cutting it precisely, so I have just ordered some comic book boards – thank you for the tip! I am happy to find instructions for finishing ornaments without glue – somehow I hope that my ornaments will become heirlooms to be passed down to grandchildren… :-)
One question – what do you do with the end of the cord after you have fastened it around the ornament? Do you push it back into the “sandwich”. Mine always looks lumpy and messy.
Thank you for great instructions!
Mary
I finished stitching 8 ornaments that I started in 1998! Now I am ready to finish them. Your instructions are complete and soooo easy to follow.
Thank you for your time to produce this tutorial.
I love your tutorial especially how to attach the cording! Thank you!
Love your directions , clear and detailed. thanks
Thanks for showing so many of us your excellent tutorial on finishing!
I appreciate the nice clear pictures. My goal is to make my ornaments look as good as yours.
I’m totally new to finishing ornaments, and even tho’ mine are needlepoint, I’m going to try using your wonderfully detailed tutorial as a guide. I noticed someone else asked about using this for needlepoint and would love to know exactly how this is done because the mesh does make a difference. Can I get help somewhere? I’m pretty PC illiterate, so don’t twitter, blog or Facebook–ugh!
Great tutorial! Thanks very much for sharing your knowledge. Now I can finish my 4 completed canvases without spending a fortune with the finisher.
Thank you for your step-by-step instructions. I was looking for how to make cording for a needlepoint scissors case and your pictures are a great help. An added bonus from your tutorial is how to finish an ornament.
Thanks again,
Angie Chute
I have spent so much money on having my ornaments finished professionally and tried your method. WOW, I think I’ll go into busiess myself finishing ornaments. Your instructions were so very clear and simple that mine looks even better than some others I have had done and paid lots for it. Now I even have fun going to my local fabric shop to search for the perfect ribbon, backing, etc. And I love making my own cording too.
[…] One of my favourite new friends, Anne, collates a whole heap of stitching finishing techniques on her blog Feather Stitching. I find it a great resource for trying something new (not my forte at all) but also the basics. Some of the links are dead – they are mostly to other people’s blogs so have patience http://focusonfinishing.wordpress.com/tutorial-links/ another link I like is here: https://stacybinnj.wordpress.com/basic-no-glue-ornament-finishing-tutorial/ […]
I’d like to join your other fans and say Thank You for a beautifully put together tutorial. Also, to tell you I ‘pinned’ this to one of my boards and this is the single biggest ‘re-pin’ from my little collection. (I’m not all that up on the Pinterest thing yet so I hope you understand the terms I used)